
キャミー・タング著「戌年」連載小説 プロのドッグトレーナーであるマリ・ムトウは、厄年を迎えている。 犬小屋と訓練所の改築をしながら、いつも不服そうにしている家族と同居することになった。母と姉に言わせれば、犬の毛とよだれかけにまみれる仕事は、家族にとって恥ずべきものだという。彼女は元カレを説得し、数ヶ月間犬を預かってもらうことにした。しかし、彼の兄は、数週間前に彼女が誤って車に追突した、怒り狂ったセキュリティ専門家であることが判明する。 アシュウィン・ケイトウは十分な問題を抱えている。叔母が玄関先に現れ、同居を希望している。彼は彼女にすべてを借りているので、断ることができません。母親が家を出て行った後、ネルおばさんはアシュウィンと弟を引き取り、愛のあるキリスト教の家庭で育てた。しかも、弟のダスティもアパートを追い出され、居場所を求めている。しかし、彼は犬を飼っている。そして、その犬の飼い主は誰だと思いますか? しかし、旧友でオアフ島のノースショアでデイスパを経営する私立探偵のエディサ・ゲレロから依頼を受ける。マリの施設で奇妙な破壊行為があり、3年前に失踪したエディサの妹の財布を発見する。エディサはマリが危険な目に遭っているのではと心配する。警備の専門家であるアシュウィンがすでにマリを知っていることを知ったエディサは、忙しい若い女性を密かに監視することを彼に依頼する。 アシュウィンは、活発でのんびりとしたドッグトレーナーに不本意ながら惹かれていく。彼女は、幸せそうな母親を思い出させる。その母親の裏切りによって、彼は人と距離を置くようになったのだ。マリは、アシュウィンの冷たい外見を見抜き、彼が家族に忠実な男であることを認める。彼は、彼女のキャリア選択を批判するだけの母親や姉とは違う。 マリのバラバラな家庭とアシュウィンのバラバラな家庭の中で、過去を隠そうとする人たちから、彼らの周りに危険が迫ってくるようになる。彼らは、影で動く秘密に光を当てることができるのか? 過去に発表されたパートへのリンクはこちら。 *** 第8章 - 恐ろしくも真っ白な不動産書類 『みんな仲良くできないのかな?』 マリは無用に力を込めて箱に本を投げ入れた。最近、なぜ彼女は人生の中で全員と言い争いをしているのだろう?もしかすると、これは本当に悪いアイデア
Captain's Log, Stardate 08.22.2008
I actually wrote out my pattern! I was getting a lot of hits on my infamous toilet seat cover, and I wanted to make a new one with “improvements,” so I paid attention and wrote things down as I made the new one.
This was originally based off the Potty Mouth toilet cover, but I altered it to fit over the seat instead of the lid.
Yarn: any worsted weight yarn, about 120 yards (this is a really tight number, I used exactly 118 yards. My suggestion is to make sure you have about 130 yards.)
I suggest using acrylic yarn because you’re going to be washing this often.
Needle: I used US 8, but you can use whatever needle size is recommended by the yarn you’re using.
Gauge: Not that important. Mine was 4 sts/1 inch in garter stitch.
6 buttons (I used some leftover shell buttons I had in my stash)
tapestry needle
Crochet hook (optional)
Cover:
Using a provisional cast on, cast on 12 stitches.
Work in garter st until liner measures 8 inches from beg, slipping first stitch of every row (this will help for later if you pick up stitches on the inside edge and if you attach the lip liner to the cover as you knit.)
Start short rows on WS
Sl1, k7 sts. Turn. Sl1, k7 sts again (total 8 sts)
Sl1, k8 sts. Turn. Sl1, k8 sts again (total 9 sts)
Sl1, k9 sts. Turn. Sl1, k9 sts again (total 10 sts)
Sl1, k10 sts. Turn. Sl1, k10 sts again (total 11 sts)
End on WS row
RS row: K until work measure three inches from the short rows.
Start short rows on WS
Sl1, k10 sts. Turn. Sl1, k10 sts again (total 11 sts)
Sl1, k9 sts. Turn. Sl1, k9 sts again (total 10 sts)
Sl1, k8 sts. Turn. Sl1, k8 sts again (total 9 sts)
Sl1, k7 sts. Turn. Sl1, k7 sts again (total 8 sts)
RS row: K until work measure 8 inches from the second set of short rows.
Start short rows on WS
Sl1, k7 sts. Turn. Sl1, k7 sts again (total 8 sts)
Sl1, k8 sts. Turn. Sl1, k8 sts again (total 9 sts)
Sl1, k9 sts. Turn. Sl1, k9 sts again (total 10 sts)
Sl1, k10 sts. Turn. Sl1, k10 sts again (total 11 sts)
End on WS row
RS row: K until work measure three inches from the short rows.
Start short rows on WS
Sl1, k10 sts. Turn. Sl1, k10 sts again (total 11 sts)
Sl1, k9 sts. Turn. Sl1, k9 sts again (total 10 sts)
Sl1, k8 sts. Turn. Sl1, k8 sts again (total 9 sts)
Sl1, k7 sts. Turn. Sl1, k7 sts again (total 8 sts)
Knit 1 row
Move provisional CO stitches from waste yarn to a needle. Bind off with kitchener stitch.
Here is a picture of the cover from the backside (WS), the "top." You can see the short rows.
 Here is a picture of the kitchener stitch bind off.
 Another view of the "bottom" and the kitchener stitch bind off on the left side.

Lip liner:
If you look at the cover from the backside (WS), the kitchener stitch BO should be at around 7 o’clock. You will start the lip liner at 5 o’clock, right before the short rows, go counterclockwise, and end at 7 o’clock, right after the short rows. (the lip liner is not a complete circle)
I knit the lip liner to the edge of the cover as I went, similar to knitting the edging onto a lace shawl. This is why I slipped the stitches for every row when knitting the cover—so that I’d have a slipped stitch to pick up on the edge and knit to the outer edge of the lip liner. You do not have to do this. If you’d rather knit the lip liner separately and then sew it to the edge of the cover, you can do that. I happen to hate sewing, mostly because my rows never match up, which is why I did it this way—this ensures the rows of my lip liner match up with the rows of the cover.
Here are a few pictures of the lip liner. I took these right after I'd finished the first section of short rows.


Here is with a piece of paper between the seat and the lip liner so you can see better.

CO 8 stitches
Knit one row (if knitting the lip liner to the cover as you go, slip last stitch through the back loop, pick up a stitch from the edge of the cover right before the short rows (going counter clockwise), then pass slipped stitch over. For every other row after this, knit last stitch of second row to the edge of the cover. Continue to slip the first stitch of every row, but especially the stitch near the outer edge, which will be knitted to the cover edge on the next row.)
Start short rows
Sl1, k6. Turn. Sl1, k6 again (knit last stitch to the outside edge of the cover, total 7 sts).
Sl1, k5. Turn. Sl1, k5 again (knit last stitch to the outside edge of the cover, total 6 sts).
Sl1, k4. Turn. Sl1, k4 again (knit last stitch to the outside edge of the cover, total 5 sts).
Sl1, k3. Turn. Sl1, k3 again (knit last stitch to the outside edge of the cover, total 4 sts).
K until work measures 8 inches from short rows
Sl1, k3. Turn. Sl1, k3 again (knit last stitch to the outside edge of the cover, total 4 sts).
Sl1, k4. Turn. Sl1, k4 again (knit last stitch to the outside edge of the cover, total 5 sts).
Sl1, k5. Turn. Sl1, k5 again (knit last stitch to the outside edge of the cover, total 6 sts).
Sl1, k6. Turn. Sl1, k6 again (knit last stitch to the outside edge of the cover, total 7 sts).
K until work measure 3 inches from short rows
Sl1, k6. Turn. Sl1, k6 again (knit last stitch to the outside edge of the cover, total 7 sts).
Sl1, k5. Turn. Sl1, k5 again (knit last stitch to the outside edge of the cover, total 6 sts).
Sl1, k4. Turn. Sl1, k4 again (knit last stitch to the outside edge of the cover, total 5 sts).
Sl1, k3. Turn. Sl1, k3 again (knit last stitch to the outside edge of the cover, total 4 sts).
K until work measures 8 inches from short rows
Sl1, k3. Turn. Sl1, k3 again (knit last stitch to the outside edge of the cover, total 4 sts).
Sl1, k4. Turn. Sl1, k4 again (knit last stitch to the outside edge of the cover, total 5 sts).
Sl1, k5. Turn. Sl1, k5 again (knit last stitch to the outside edge of the cover, total 6 sts).
Sl1, k6. Turn. Sl1, k6 again (knit last stitch to the outside edge of the cover, total 7 sts).
Knit 1 row
Bind off. For last two stitches in bind off row: Slip last stitch through back loop, pick up a stitch from the edge of the cover, then pass the slipped stitch over. Then bind off the stitch as normal.

Bottom piece:
Pick up and knit about 9 stitches (give or take a few) along the bottom edge of the cover (at the six o’clock position. Knit 7 or 8 rows. Bind off.
Inside edging:
Pick up and knit along inside edge of cover. (Here’s where those slipped stitches come in handy to help you pick up stitches.)
(The real original reason I did this: the cover ended up being a little smaller than the last time I made this and I hadn’t liked how much it had had to stretch even when I first made it, so I came up with the brilliant idea of adding some rows. What I discovered is that this picked up edge makes the inside edge of the cover lie smoother on the seat. Serendipity! If you’d rather not do these extra rows, just cast on a few more stitches when you knit the cover to make it a bit wider.)
Purl 3 rows. (What I did: I wrapped the yarn around the next stitch and turned the work, then knit the next 3 rounds from the opposite side so they’d come out as purl rows on the right side.)
You might want to adjust these rows depending on your yarn and gauge and how wide your cover is already.
Bind off very loosely. I used a US 15 needle tip to bind off.
Finishing:
Make two i-cords or crochet chains each about 5 inches long and attach them as loops to the 5 o’clock and 7 o’clock corners of the lip liner.
Sew buttons to top corners of bottom piece. The chains on the 5 o’clock and 7 o’clock corners of the lip liner will attach to these buttons underneath the seat.
Sew button to top middle (6 o’clock) of bottom piece.
Sew buttons to 12 o’clock, 3 o’clock, and 9 o’clock of lip liner.
Make two i-cords or crochet chains each about 4 inches long (may need to adjust depending on your toilet seat) and attach them to the cover. Attach one chain at 1 o’clock and 11 o’clock, and attach the other chain at 5 o’clock and 7 o’clock. I attached them near the 4 short row sections.
Make two i-cords or crochet chains each about 5 inches long (may need to adjust depending on your toilet seat) and attach them to the cover. Attach one chain at 2 o’clock and 4 o’clock, and attach the other chain at 8 o’clock and 10 o’clock.
The two chains will reach under the seat and attach to the buttons on the lip liner.
The chain at 1 o’clock and 11 o’clock will attach to the button at 12 o’clock.
The chain at 5 o’clock and 7 o’clock will attach to the button at the top middle (6 o’clock) of the bottom piece.
The chain at 2 o’clock and 4 o’clock will attach to the button at 3 o’clock.
The chain at 8 o’clock and 10 o’clock will attach to the button at 9 o’clock.
Weave in all ends.
I can't believe I am actually sharing a picture of my toilet, but I can't think of any other way to show you how it fits onto the seat.


 If you like romance novels, please check out my list of free short stories, novellas, and novels available on my blog! I write Christian contemporary romance and romantic suspense as Camy Tang, and Christian Regency romance as Camille Elliot. Click here to knit the antique scarf pattern from my Regency romance novel, The Spinster's Christmas.
I actually wrote out my pattern! I was getting a lot of hits on my infamous toilet seat cover, and I wanted to make a new one with “improvements,” so I paid attention and wrote things down as I made the new one.
This was originally based off the Potty Mouth toilet cover, but I altered it to fit over the seat instead of the lid.
Yarn: any worsted weight yarn, about 120 yards (this is a really tight number, I used exactly 118 yards. My suggestion is to make sure you have about 130 yards.)
I suggest using acrylic yarn because you’re going to be washing this often.
Needle: I used US 8, but you can use whatever needle size is recommended by the yarn you’re using.
Gauge: Not that important. Mine was 4 sts/1 inch in garter stitch.
6 buttons (I used some leftover shell buttons I had in my stash)
tapestry needle
Crochet hook (optional)
Cover:
Using a provisional cast on, cast on 12 stitches.
Work in garter st until liner measures 8 inches from beg, slipping first stitch of every row (this will help for later if you pick up stitches on the inside edge and if you attach the lip liner to the cover as you knit.)
Start short rows on WS
Sl1, k7 sts. Turn. Sl1, k7 sts again (total 8 sts)
Sl1, k8 sts. Turn. Sl1, k8 sts again (total 9 sts)
Sl1, k9 sts. Turn. Sl1, k9 sts again (total 10 sts)
Sl1, k10 sts. Turn. Sl1, k10 sts again (total 11 sts)
End on WS row
RS row: K until work measure three inches from the short rows.
Start short rows on WS
Sl1, k10 sts. Turn. Sl1, k10 sts again (total 11 sts)
Sl1, k9 sts. Turn. Sl1, k9 sts again (total 10 sts)
Sl1, k8 sts. Turn. Sl1, k8 sts again (total 9 sts)
Sl1, k7 sts. Turn. Sl1, k7 sts again (total 8 sts)
RS row: K until work measure 8 inches from the second set of short rows.
Start short rows on WS
Sl1, k7 sts. Turn. Sl1, k7 sts again (total 8 sts)
Sl1, k8 sts. Turn. Sl1, k8 sts again (total 9 sts)
Sl1, k9 sts. Turn. Sl1, k9 sts again (total 10 sts)
Sl1, k10 sts. Turn. Sl1, k10 sts again (total 11 sts)
End on WS row
RS row: K until work measure three inches from the short rows.
Start short rows on WS
Sl1, k10 sts. Turn. Sl1, k10 sts again (total 11 sts)
Sl1, k9 sts. Turn. Sl1, k9 sts again (total 10 sts)
Sl1, k8 sts. Turn. Sl1, k8 sts again (total 9 sts)
Sl1, k7 sts. Turn. Sl1, k7 sts again (total 8 sts)
Knit 1 row
Move provisional CO stitches from waste yarn to a needle. Bind off with kitchener stitch.
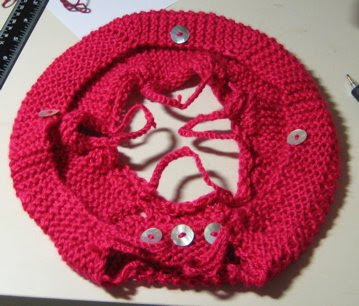
Here is a picture of the cover from the backside (WS), the "top." You can see the short rows.
 Here is a picture of the kitchener stitch bind off.
 Another view of the "bottom" and the kitchener stitch bind off on the left side.
Lip liner:
If you look at the cover from the backside (WS), the kitchener stitch BO should be at around 7 o’clock. You will start the lip liner at 5 o’clock, right before the short rows, go counterclockwise, and end at 7 o’clock, right after the short rows. (the lip liner is not a complete circle)
I knit the lip liner to the edge of the cover as I went, similar to knitting the edging onto a lace shawl. This is why I slipped the stitches for every row when knitting the cover—so that I’d have a slipped stitch to pick up on the edge and knit to the outer edge of the lip liner. You do not have to do this. If you’d rather knit the lip liner separately and then sew it to the edge of the cover, you can do that. I happen to hate sewing, mostly because my rows never match up, which is why I did it this way—this ensures the rows of my lip liner match up with the rows of the cover.
Here are a few pictures of the lip liner. I took these right after I'd finished the first section of short rows.


Here is with a piece of paper between the seat and the lip liner so you can see better.

CO 8 stitches
Knit one row (if knitting the lip liner to the cover as you go, slip last stitch through the back loop, pick up a stitch from the edge of the cover right before the short rows (going counter clockwise), then pass slipped stitch over. For every other row after this, knit last stitch of second row to the edge of the cover. Continue to slip the first stitch of every row, but especially the stitch near the outer edge, which will be knitted to the cover edge on the next row.)
Start short rows
Sl1, k6. Turn. Sl1, k6 again (knit last stitch to the outside edge of the cover, total 7 sts).
Sl1, k5. Turn. Sl1, k5 again (knit last stitch to the outside edge of the cover, total 6 sts).
Sl1, k4. Turn. Sl1, k4 again (knit last stitch to the outside edge of the cover, total 5 sts).
Sl1, k3. Turn. Sl1, k3 again (knit last stitch to the outside edge of the cover, total 4 sts).
K until work measures 8 inches from short rows
Sl1, k3. Turn. Sl1, k3 again (knit last stitch to the outside edge of the cover, total 4 sts).
Sl1, k4. Turn. Sl1, k4 again (knit last stitch to the outside edge of the cover, total 5 sts).
Sl1, k5. Turn. Sl1, k5 again (knit last stitch to the outside edge of the cover, total 6 sts).
Sl1, k6. Turn. Sl1, k6 again (knit last stitch to the outside edge of the cover, total 7 sts).
K until work measure 3 inches from short rows
Sl1, k6. Turn. Sl1, k6 again (knit last stitch to the outside edge of the cover, total 7 sts).
Sl1, k5. Turn. Sl1, k5 again (knit last stitch to the outside edge of the cover, total 6 sts).
Sl1, k4. Turn. Sl1, k4 again (knit last stitch to the outside edge of the cover, total 5 sts).
Sl1, k3. Turn. Sl1, k3 again (knit last stitch to the outside edge of the cover, total 4 sts).
K until work measures 8 inches from short rows
Sl1, k3. Turn. Sl1, k3 again (knit last stitch to the outside edge of the cover, total 4 sts).
Sl1, k4. Turn. Sl1, k4 again (knit last stitch to the outside edge of the cover, total 5 sts).
Sl1, k5. Turn. Sl1, k5 again (knit last stitch to the outside edge of the cover, total 6 sts).
Sl1, k6. Turn. Sl1, k6 again (knit last stitch to the outside edge of the cover, total 7 sts).
Knit 1 row
Bind off. For last two stitches in bind off row: Slip last stitch through back loop, pick up a stitch from the edge of the cover, then pass the slipped stitch over. Then bind off the stitch as normal.

Bottom piece:
Pick up and knit about 9 stitches (give or take a few) along the bottom edge of the cover (at the six o’clock position. Knit 7 or 8 rows. Bind off.
Inside edging:
Pick up and knit along inside edge of cover. (Here’s where those slipped stitches come in handy to help you pick up stitches.)
(The real original reason I did this: the cover ended up being a little smaller than the last time I made this and I hadn’t liked how much it had had to stretch even when I first made it, so I came up with the brilliant idea of adding some rows. What I discovered is that this picked up edge makes the inside edge of the cover lie smoother on the seat. Serendipity! If you’d rather not do these extra rows, just cast on a few more stitches when you knit the cover to make it a bit wider.)
Purl 3 rows. (What I did: I wrapped the yarn around the next stitch and turned the work, then knit the next 3 rounds from the opposite side so they’d come out as purl rows on the right side.)
You might want to adjust these rows depending on your yarn and gauge and how wide your cover is already.
Bind off very loosely. I used a US 15 needle tip to bind off.
Finishing:
Make two i-cords or crochet chains each about 5 inches long and attach them as loops to the 5 o’clock and 7 o’clock corners of the lip liner.
Sew buttons to top corners of bottom piece. The chains on the 5 o’clock and 7 o’clock corners of the lip liner will attach to these buttons underneath the seat.
Sew button to top middle (6 o’clock) of bottom piece.
Sew buttons to 12 o’clock, 3 o’clock, and 9 o’clock of lip liner.
Make two i-cords or crochet chains each about 4 inches long (may need to adjust depending on your toilet seat) and attach them to the cover. Attach one chain at 1 o’clock and 11 o’clock, and attach the other chain at 5 o’clock and 7 o’clock. I attached them near the 4 short row sections.
Make two i-cords or crochet chains each about 5 inches long (may need to adjust depending on your toilet seat) and attach them to the cover. Attach one chain at 2 o’clock and 4 o’clock, and attach the other chain at 8 o’clock and 10 o’clock.
The two chains will reach under the seat and attach to the buttons on the lip liner.
The chain at 1 o’clock and 11 o’clock will attach to the button at 12 o’clock.
The chain at 5 o’clock and 7 o’clock will attach to the button at the top middle (6 o’clock) of the bottom piece.
The chain at 2 o’clock and 4 o’clock will attach to the button at 3 o’clock.
The chain at 8 o’clock and 10 o’clock will attach to the button at 9 o’clock.
Weave in all ends.
I can't believe I am actually sharing a picture of my toilet, but I can't think of any other way to show you how it fits onto the seat.


 If you like romance novels, please check out my list of free short stories, novellas, and novels available on my blog! I write Christian contemporary romance and romantic suspense as Camy Tang, and Christian Regency romance as Camille Elliot. Click here to knit the antique scarf pattern from my Regency romance novel, The Spinster's Christmas.
Comments
I'm sure it'd make an entertaining gift, too, for that "hard to buy for" person.
Camy
Many thanks Camy!
Aislynn
Camy